Using the UR teaching pendant for Script programming.
In this method of script programming you still need the teaching pendant, but this function is very helpful and makes it possible to edit part or entire program on another computer while the robot is running production.
This function can be used extensive script programming, but also just as a method to manipulate variables, input/output states and especially timers. This makes the programming very elegant i.e. the program tree is the overall pattern and flow of the program whereas things that can change such as variables I/O and timers are kept in separate blocks. In this way the commissioning and adjustment can be done in these blocks without touching the program flow.
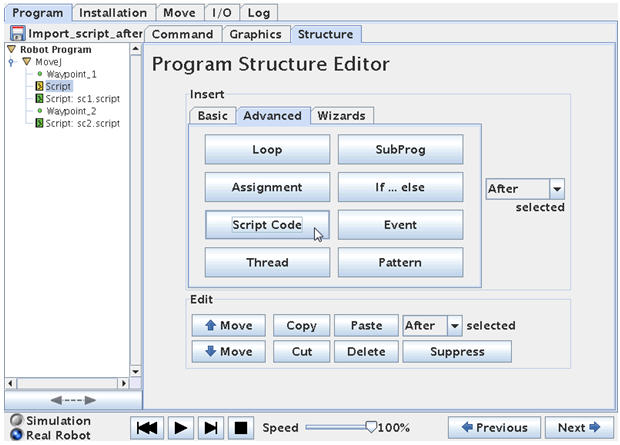
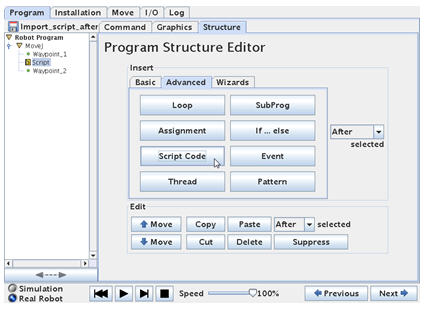
In the Advanced program menu under Structure section the Script Code object is located. This object will insert at “Script:” entry into the program. Note it is still yellow which means we have to define it.
To define the Script entry in the program – point on the Script line to define and choose “Command” on top of the menus.
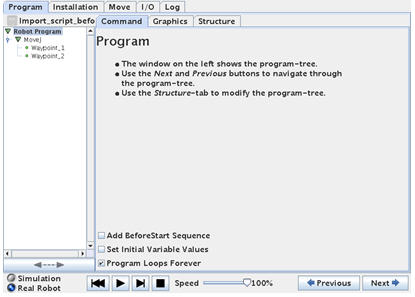
However before we proceed with the programming we need to prepare our Script file – otherwise there is nothing to load so let’s step a little back to the point where we have no Script entries in the program tree and just two simple Waypoints.
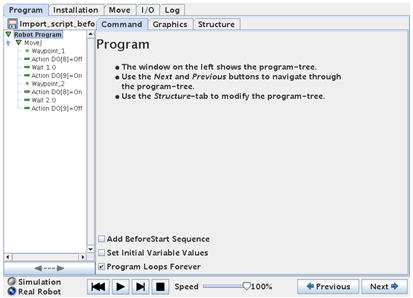
I am planning to change 2 outputs in between the two Waypoints and after the last Waypoint before the program goes back to Waypoint 1. And I need a delay in between the change of the 2 outputs – note the second delay is 2 seconds whereas the first is 1 second.
This could also be done by using the traditional teaching pendant method and it would look like below program.
But in this case we want to use the Script method so we have a separate Script file with our variables for later adjustment opportunity while the robot is running production.
So before we go any further we only have a small program with 2 waypoints.
Now we need to prepare the separate Script file. The format of the Script statements can be studied in the Script manual, but a very useful method to learn about the format of a Script language is to open a Script file the robot already have provided from previous created program. Remember the robot creates three files every time a program file is saved – a x.urp file which is the robots main program file – a x.txt file which is a very simple text file to illustrate the program flow and a x.script file which is the actual program in script format. Try and open such an x.script file in a simple editor e.g. a Notepad and study the contents.
For example our first program looked like this in script format:
My_first_program.script
def My_first_program():
set_analog_inputrange(0, 0)
set_analog_inputrange(1, 0)
set_analog_outputdomain(0, 0)
set_analog_outputdomain(1, 0)
set_tool_voltage(24)
set_runstate_outputs([])
set_payload(0.0)
set_gravity([0.0, 0.0, 9.82])
while True:
$ 0 “Robot Program”
$ 1 “MoveJ”
$ 2 “Waypoint_1”
movej([-0.7601482324296471, -1.9284112483400442, 2.4200850009312065, -2.13148960204731, -1.562351390833685, -0.9523963238633675], a=1.3962634015954636, v=1.0471975511965976)
$ 3 “Waypoint_2”
movej([-0.7601145807261123, -1.925313457229536, 1.4271208291636501, -1.1406326407517442, -1.5621569587688118, -0.9518539657810257], a=1.3962634015954636, v=1.0471975511965976)
end
end
Don’t dwell too much into the details at this stage of this script file and may just study a single line statement e.g. the “set_tool_voltage(24)” which sets the Voltage on the tool to 24 Volt and compare to the explanation in the “scriptmanual_enx.x” document.

Note that in this case the robot has wrapped the Script code around with some initial definitions that you do not see in the tree structure, but that’s default robot settings and also comments like “$ 2 “Waypoint_1″” – this you might or might not need in your Script file depending on your complexity of your Script program and also because we are inserting Script code into a part of a already existing robot program and therefore some of these wrappings will be duplicated and cause program errors – so in this first simple case we do not need it.
Study also the long “movej(xx, xx, xx, …………, v= xx) which is actual positions of the waypoints. The meaning of the values will be explained later section.
In our case we just need two script files because we need to insert Script code at to different locations in the program i.e. in between the Waypoints and after the last Waypoint – and we need two files because they need different contents because we swap the status of the outputs.
Some we will now prepare the Script files on a PC computer and we just use a simple editor such as Notepad to create these two files.
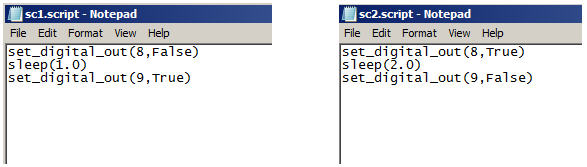
Note that the two outputs have swooped states and the delay has increased from 1 to 2 seconds. Also note the two files has different names i.e. sc1.script and sc2.script.
Also note how the “Wait 1.0” functions is now called “Sleep(1.0)” which is in line with standard Script language.
So now instead of programming these functions in the program tree we want to import these files instead.
Now we can proceed to insert a Script: statement into the program tree by picking it from the advanced program object menu and it comes into the program as yellow because so far it is undefined.
Point on the “Script:” statement and choose “Command” screen. In this screen the Script function is defined. On the right hand side the amount of script commands are chosen i.e. only one line of script code or from a separate file containing maybe several script commands.
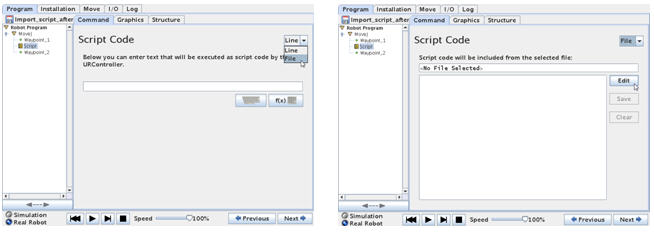
In this case we choose file because understand file will also explain a single line – and the right screen appears.
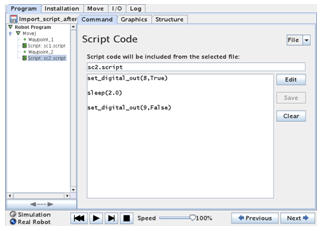
So far no file has been chosen – hence there are no script statements. Choose “Edit”.
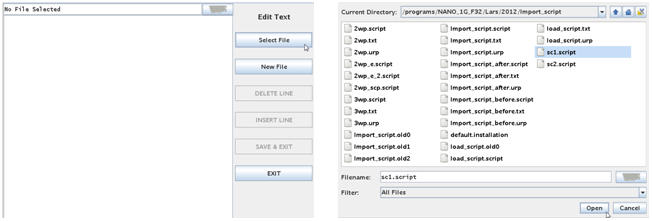
Then choose “Select File” which will bring you to the file menu where you can navigate to your file destination of your prepared Script program block. Then choose your intended Script file and choose Open – in this case the sc1.script file we have prepared and choose “Open”.
This will open your Script file. Choose “Save & Exit” which will complete you’re “Script:” statement in the program tree and therefore turn green.
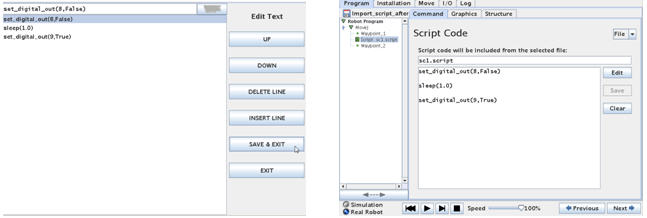
Note how the contents of the Script file now have entered into our program under the Script: statement.
Now follow the exact way to insert a second “Script” statement under Waypoint_2, but this time import the script file “sc2.script” instead.
Then your program should look like this.
Now try to test run your program which behave exactly like if the outputs and wait has been made in the tree structure.
Save the file which of cause will create three new files x.urp, x.txt and x.script which now has the entire program inside including the Script files interpreted by the Robot.
def Import_script_after():
set_analog_inputrange(0, 0)
set_analog_inputrange(1, 0)
set_analog_outputdomain(0, 0)
set_analog_outputdomain(1, 0)
set_tool_voltage(24)
set_runstate_outputs([])
set_payload(0.0)
set_gravity([0.0, 0.0, 9.82])
while True:
$ 0 “Robot Program”
$ 1 “MoveJ”
$ 2 “Waypoint_1”
movej([-0.5263706597088378, -1.8182878349727298, -1.8120234982472114, -1.3619128328552264, 3.214885380931556, -0.27251695975573664], a=1.3962634015954636, v=1.0471975511965976)
set_digital_out(8,False) sleep(1.0) set_digital_out(9,True)
$ 4 “Waypoint_2”
movej([-0.8560998108900053, -1.7976119215251396, -1.7847397963745542, -1.410065160905723, 3.2146832909469674, -0.27251695975573664], a=1.3962634015954636, v=1.0471975511965976)
set_digital_out(8,True) sleep(2.0) set_digital_out(9,False)
end
end
Note how the content of our two script files has been inserted to the program (marked with yellow). The big advantage now is that we still have our two script files we can edit with an editor on another computer and make adjustments to our variables e.g. if we want to change output or change timer values it can be done while the robot is running production and then when there is a break be loaded into the robot program which can immediately be started.
It is possible to have the entire program as a script file and import in this way – so the tree structure will only have one statement – a Script: statement where the entire program is in a script file and thereby loaded into the robot. But in such case some of the wrappings and comments has to be removed from the script file format the robot create by itself in order to avoid double definitions.
Disclaimer: While the Zacobria Pte. Ltd. believes that information and guidance provided is correct, parties must rely upon their skill and judgement when making use of them. Zacobria Pte. Ltd. assumes no liability for loss or damage caused by error or omission, whether such an error or omission is the result of negligence or any other cause. Where reference is made to legislation it is not to be considered as legal advice. Any and all such liability is disclaimed.
If you need specific advice (for example, medical, legal, financial or risk management), please seek a professional who is licensed or knowledgeable in that area.
Author:
By Zacobria Lars Skovsgaard